 Device Maintenance Configure 802.1X
Configure 802.1X allows the configuration of 802.1X data for devices to authenticate with an 802.1X-enabled network. The interfaces supported are Control, AVB and VoIP. This function is only enabled on server-class devices and the TesiraXEL 1200 amplifiers.
Select a device from the Device List to configure. If an unsupported device is selected, the user will be presented with a dialog stating 802.1X may not be supported on the selected device. If the device supports 802.1X but is disconnected for any reason when "Configure 802.1X," is selected or if the selected device cannot be communicated with (such as it is connected to the authenticated port but hasn't authenticated,) a dialog stating "failed to get 802.1X configuration data" will be displayed.
Note: Make sure the device is connected to an un-authenticated port to configure 802.1X.
Configure 802.1X Dialog
For supported devices, the user will be given the option to configure the Control port, VoIP or AVB. Enabling Network Time Protocol (NTP) server synchronization is recommended when configuring 802.1X. See Date Time Settings section of Device Maintenance for more information.
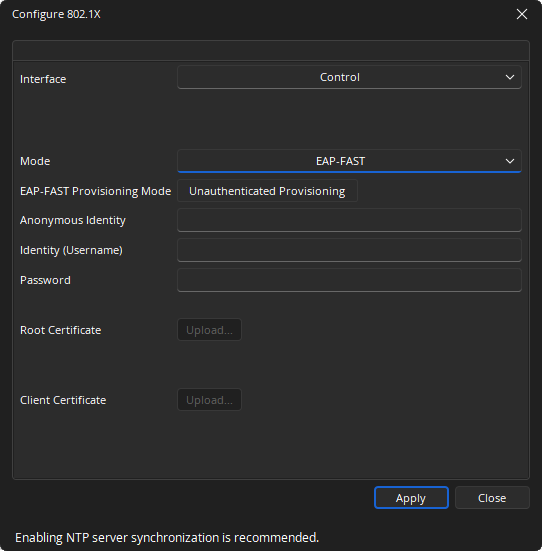
Notes:
- For VoIP, if multiple cards are present they will be shown below the Interface (Control/VoIP) dropdown.
- When switching between the Control, VoIP and AVB interfaces, all changes made will be retained and applied if "Apply" is clicked.
- All fields are the same for Control, VoIP and AVB settings, except as noted.
- Data is checked in real time while users enter data. Required data, errors and missing data will be highlighted with a tooltip.
Mode
Establishes the protocol by which the authentication takes place.
Disabled: Default setting.
EAP-MD5: Challenge-based password.
EAP-TLS: Certificate-based two-way authentication.
EAP-PEAP/MSCHAPv2: Server authentication via certificate; client authentication via another EAP method.
EAP-FAST: Certificate-based two-way authentication. Provisioning Mode will have two options available:
- Unauthenticated Provisioning
- Authenticatied Provisioning
EAP-TTLS/EAP-MSCHAPv2: Optional server authentication via certificate; client authentication via another EAP method.
Note: Depending on which Mode is selected, disabled fields will be shaded light grey. Required fields will be highlighted.
Identity
Anonymous Identity: Optional field. Only enabled when "EAP-FAST" or "EAP-TTLS/EAP-MSCHAPv2" is set as Mode.
Identity (Username): Disabled if Mode is disabled. Credentials are required for all other Mode settings.
Password: Disabled if Mode is disabled or set to "EAP-TLS."
Certificates
Root Certificate: Gives users the option to upload their own root certificate. Uploading a root certificate option is disabled if Mode is set to one of the following:
- Disabled
- EAP-MD5
- EAP-FAST and EAP-FAST Provisioning Mode set to "Unauthorized Provisioning"
Click the "Upload" button to select a certificate from a file browser. The following information will be shown next to the Root Certificate Info text when a valid certificate is imported:
- Issuer
- Issued to
- Valid from
- Valid to
Note: Root Certificate formats must be either .pem or .der. and is limited to a size of 10K (10240 bytes).
Client Certificate: Click the "Upload" button to select a certificate from a file browser. The following information will be shown next to the Client Certificate Info text when a valid certificate is imported:
- Issuer
- Issued to
- Valid from - Valid to
- Only required in EAP-TLS mode.
For authentication methods that require this certificate, the Identity (Username) must match the text next to "Issued to:" in the fields to the right of Client Certificate preceded by the domain name. See image below for an example of the correct format: "biamp" being the domain, and "admin" being the username. Note that the domain and username are provided as examples only; in order for a device to authenticate on the server, a valid username must be entered that exists on the authentication server.
Note: Client Certificate format must be .pem. and is limited to a size of 10K (10240 bytes).
Failure to Upload or Validate
There are numerous potential issues to consider if a certificate fails to upload or validate:
- The file is empty
- The certificate file has exceeded the maximum size limit of 10K (10240 bytes)
- The uploaded Root certificate has failed validation; make sure the file has a certificate section and no private key
- The uploaded Client certificate has failed validation, make sure the file has a certificate section and does have a private key
- The certificate is expired or not yet valid*
Uploading a certificate that is expired or has a future valid-from date is allowed, but a "This certificate has expired or is not yet valid" message will display.
Note: On some servers the Identity (Username) must be unique for each port on the switch. For example, two VoIP ports cannot use the same Username nor can a Control and VoIP port use the same Username. This applies to devices as well (two or more devices cannot use the same Username.)
Applying Entered Information
When all information is entered click "Apply." Users will be presented with a dialog box if there is any incomplete or missing information. Settings will not be saved until the correct data is entered. If no changes are made to the Control Port interface configuration from the Configure 802.1X dialog, clicking "Apply" will force the authentication process to restart. A status dialog will show that configuration changes have been applied and authentication is in progress.
Authentication Status
The following statuses may be displayed:
- Configured without layout - indicates 802.1X is configured on the VoIP card but there is no layout on the device (this status only applies to VoIP)
- Authenticating - 802.1X authentication in process with the server
- Authenticated - 802.1X authentication successful
- Not Authenticated - 802.1X authentication failed
Note: 802.1X negotiation only occurs during a link change from a non-secure port to an 802.1X-enabled port on the Control interface.
VoIP Authentication
Both the Control and VoIP ports will raise a fault if authentication fails, showing a fault message and illuminating the fault light on the front panel of the device. Yet when the VoIP card again attempts to authenticate, the fault light and message will clear (approximately every 30 seconds) and will remain off during the reboot/attempt to authenticate (approximately 10 seconds.)
This cycle will continue until the VoIP port successfully authenticates.